
Step-by-Step Strategies for Securing Your Android Smartphone

Step-by-Step Strategies for Securing Your Android Smartphone
Quick Links
- Restrict App Permissions
- Uninstall Unused Apps
- Put Chrome on a Leash
- Stop Websites From Tracking You
- Or, Switch to an Entirely Different Browser
- Don’t Trust Incognito Mode
- Limit Your Lock Screen Notifications
- Opt-Out of Google’s Personalizations
Android has a less-than-stellar reputation for privacy. But Google has been working to change that narrative, with each new release introducing more privacy-focused tools to help you safeguard your personal information. Some, though, aren’t enabled by default.
Those defaults are due partly to Google needing access to such data to personalize a lot of the content you see, making for a better experience overall. This data is also used to serve tailored ads you’re more likely to click . However, if you aren’t interested in any of that, here’s what you can do to reduce your exposure.
Restrict App Permissions
Passwords and fingerprint IDs are common ways of protecting your Android phone from people who come in contact with your device. But if you want to up your privacy, you might do well to start from the very apps you use daily. One way to take control is to manage your app permissions to ensure they only have access to what’s necessary.
Android looks different depending on the model and brand you’re using. We’re using a Samsung Galaxy phone in the screenshots below, but the general paths to settings should be mostly the same regardless of your device.
Open your Settings app and head to the Privacy option.
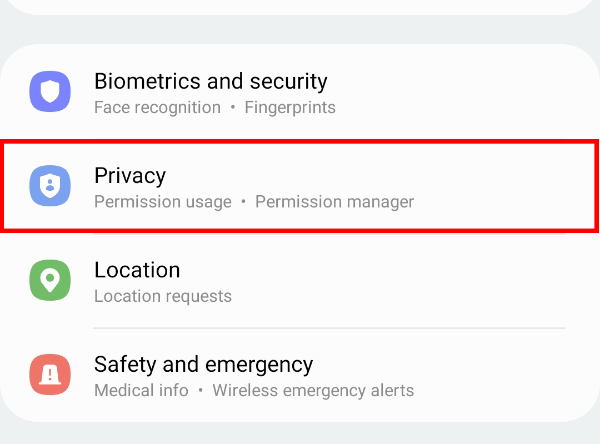
Here, you can access all permissions on your phone—including popular ones like the camera, microphone, or location—to see which apps are using them. You can then select an app and change how it accesses these settings.
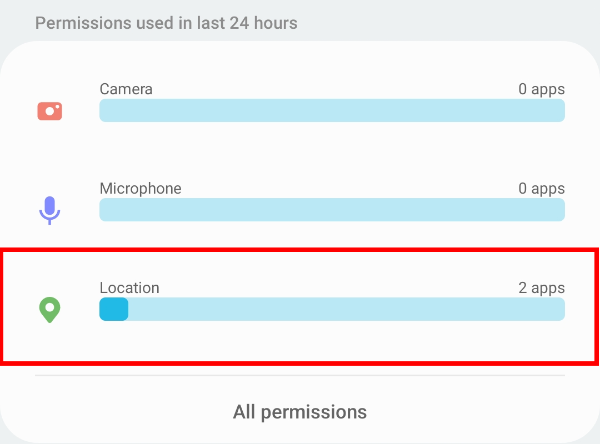
Many permissions will be limited to Allow or Don’t allow. But for the location, camera, and microphone options, you have more control. In Android 10, you can either choose “Allow all the time,” “Allow only while using the app,” or “Deny.” Android 11 and above takes things up a notch, removing the “Allow all the time” option entirely for the camera and microphone—location services still retain the option.
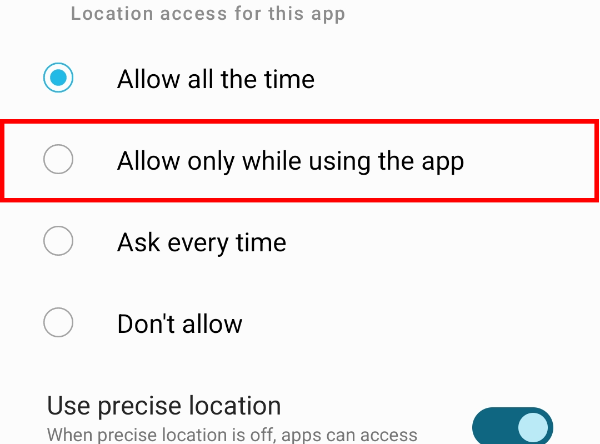
Such one-time permissions limit background usage and allow you to test apps without fear. Plus, you can toggle an option for location data to reduce its accuracy in later Android versions. This will enable you to get nearby results without revealing your exact location. In addition, you can set apps to lose their permissions automatically if you haven’t used them for a specified time.
Uninstall Unused Apps
Sometimes you install new apps, you use them for one-time tasks and forget about them. Other times, we just keep them around in case we need them in the future but rarely do. If you scroll through your phone’s app drawer, chances are you’ll find many installed apps that you don’t use.
If that’s the case, you should consider getting rid of them . It’ll improve your privacy, as some apps may continue running in the background, collecting and sharing your personal data . Not to mention that you’ll also recover some much-needed storage space on your device.
Related: How to Uninstall Multiple Apps at Once on Android
Put Chrome on a Leash
Google Chrome is the default browser on most Android phones and is a direct funnel for the company to collect your data. They use your behavior with the app to create an elaborate profile of you, then personalize ads based on that data. If you don’t like that, there are a few things you can do.
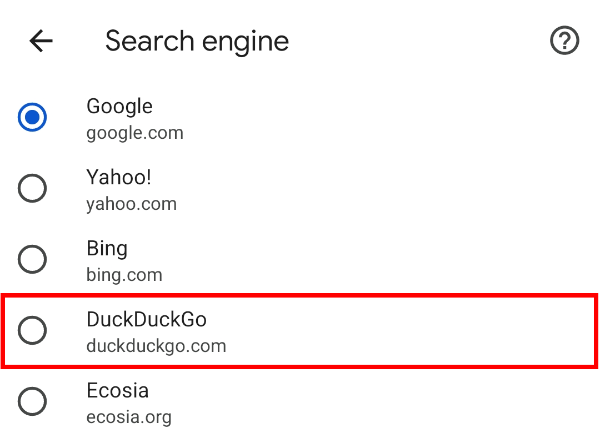
For starters, you can change your search engine. There are several private alternatives to choose from, DuckDuckGo , doesn’t log search queries and might be your best bet. Head to Chrome’s settings and click “Search engine.”
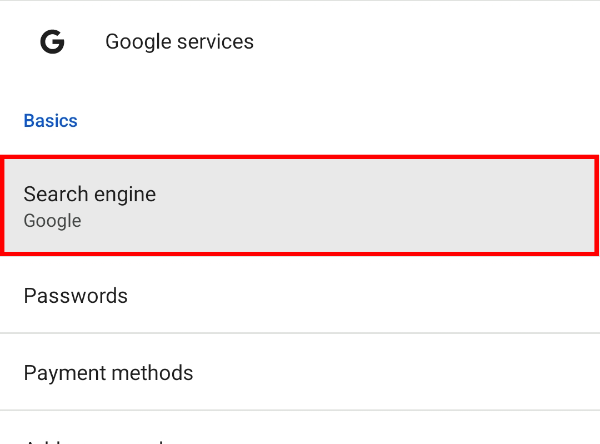
Choose an option other than Google. But it goes without saying that if you ditch the number one search engine in the world, your search results may not be as spot-on as before.
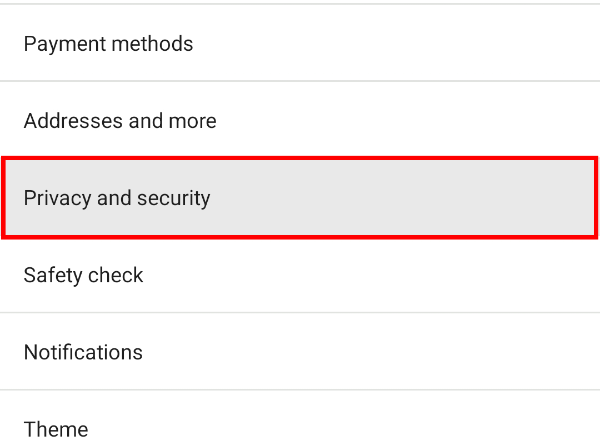
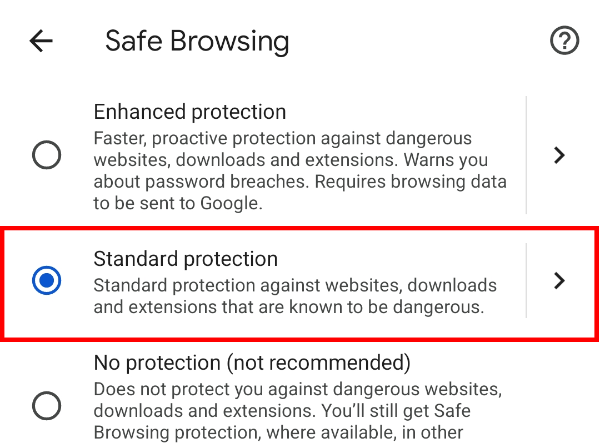
Another thing you can do in Settings is opt-out of Enhanced Safe Browsing . This feature substantially improves your protection against malicious websites and dangerous downloads and is a step above Chrome’s “Standard protection.” However, it comes at the expense of collecting more data on your browsing activity. To remove it, navigate to Chrome’s settings and choose “Privacy and Security.”
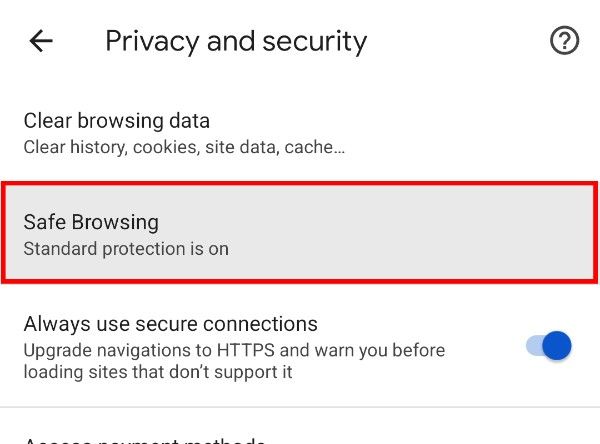
Tap on “Safe Browsing.”
Select “Standard Protection” or “No Protection.” If you choose No Protection, make sure you use strong cybersecurity practices .
Related: 9 Cybersecurity Tips to Stay Protected in 2023
Stop Websites From Tracking You
While you limit how much of your data Google has access to, you might also want to ensure that third-party sites are siphoning this data for themselves. To start, go to Chrome’s Settings and tap “Privacy and Security.”

Select “Clear Browsing Data.”
![]()
You’ll be allowed to erase basic things like your search history, cached images, and cookies anywhere from the last hour to all time.
![]()
But if you move to the “Advanced” tab, you get the additional option of deleting saved passwords, site settings, and auto-fill form data.
![]()
Another thing you can do would be to turn off page preloading (also under “Privacy and Security”). Page preloading helps speed up your browsing experience, with Google using it on sites it predicts you’re likely to visit next (even though you might not). But this also means more access to your browsing data. To turn it off, go to “Preload Pages.”
![]()
Select “No Preloading.”
![]()
You could also toggle off the “Access Payment Methods” option (also under “Privacy and Security”), which allows websites you visit to check if you have saved payment methods in Chrome, including credit cards, debit cards, or apps.
![]()
Meanwhile, you can prevent websites from generating cookies and using them to follow you around the web. However, keep in mind that some features, like saved sign-ins, on some platforms may break along the way.
Go to Settings > Site Settings.
![]()
Tap “Cookies.”
![]()
Select “Block Third-Party Cookies.”
![]()
Finally, turn on “Do Not Track.” This will send a request to any website you visit, telling it not to track you with cookies.
![]()
It’s not a foolproof solution, as websites may ignore this setting and collect your browsing data anyway. Still, it’s worth a shot.
Or, Switch to an Entirely Different Browser
If changing search engines and limiting Chrome is not enough, you can ditch the browser entirely for a different option. There are many privacy-focused options to choose from if you do go down this route. Microsoft Edge , Samsung Internet , and Brave are popular options to try, with Brave putting a special emphasis on privacy . But if you want something not based on Google’s Chromium engine, Firefox and Firefox Focus are great alternatives.
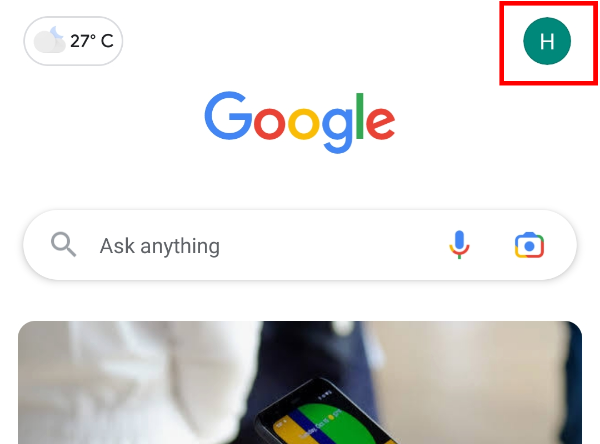
After installing one, you can make any of these your default browsing option by long-pressing them on your home screen or app drawer, tapping the (i) icon, navigating to “Defaults,” and choosing “Browser app.” But if you use the Google app, it’ll still open links in a custom Chrome tab. To change this, open Google, and tap your profile picture in the top right corner.
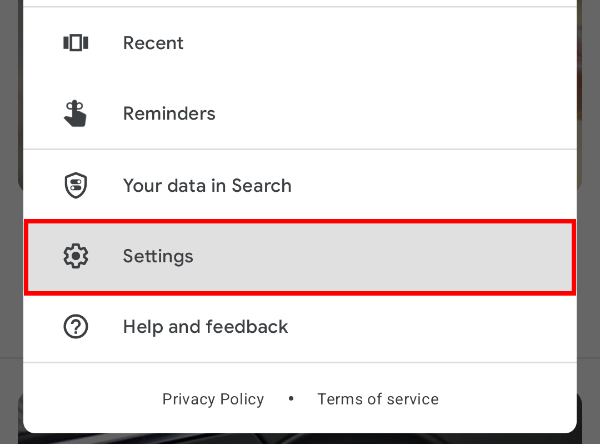
Go to “Settings.”
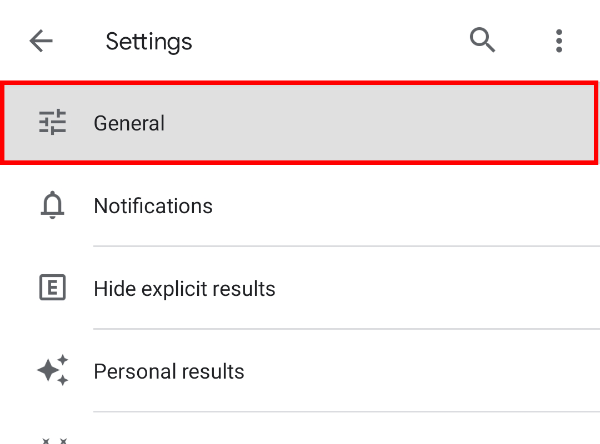
Select “General.”
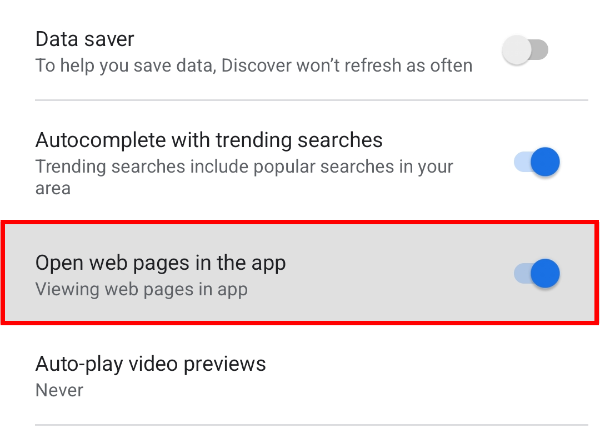
Toggle off “Open Web Pages in the App.”
Don’t Trust Incognito Mode
Regardless of the browser you settle for, don’t rely on incognito mode if you want to maintain a low profile online. That’s because your ISP and public Wi-Fi providers might be able to see the websites you visit anyway. Even some ad trackers (fingerprinting you using a combination of your software, hardware, and IP address rather than cookies) can track you in incognito mode.
If you want true anonymity, you’re better off with the Firefox-based Tor browser or, better still, settling with one of the many trustworthy VPNs available . Both options run your queries through additional servers, concealing your identity and location from your ISP.
Limit Your Lock Screen Notifications
Viewing messages and other alerts without unlocking your phone is one of life’s conveniences. But the downside is that it can be revealing. If your device falls into the wrong hands, it could compromise sensitive information such as private messages and two-factor codes . However, if you don’t mind the slight inconvenience, you can limit notifications and sensitive content from appearing on your lock screen with a short trip to the Settings app.
Related: How to Hide Sensitive Notifications on Your Android Lock Screen
Visit your phone’s lock screen notification settings within the Settings app—it could be under the lock screen, privacy, or even a standalone notification option depending on your device. From here, you can tweak the options so that only icons appear rather than full details, or turn off “Sensitive Notifications” if your device allows it. This will ensure that your private conversations stay that way.
Opt-Out of Google’s Personalizations
Technically, it’s possible to use your Android phone without a Google account. But from lack of access to the Play Store to the inability to seamlessly sync data between your devices, this is hardly a feasible option—ask Huawei. Your Google account goes beyond just Android, though. It’s your gateway to the numerous services Google offers, including email, calendar, photos, and productivity tools like Docs and Sheets. These services are mostly ubiquitous and free—although you do pay, in a way, with your data.
It doesn’t have to be a case of data or convenience, though, as there are ways to limit how much of your data the tech giant has access to while maintaining an account. To start, head to Settings > Users and accounts/Accounts and backup.
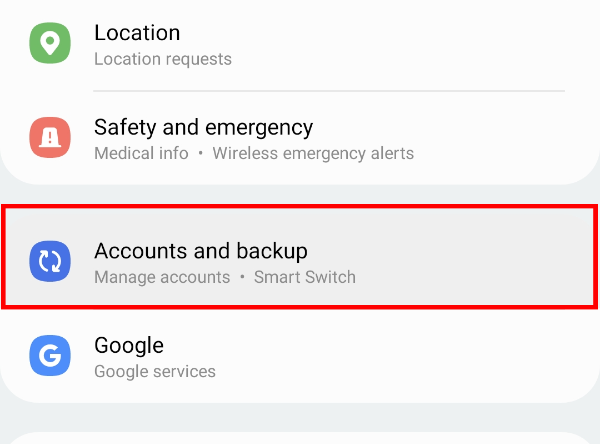
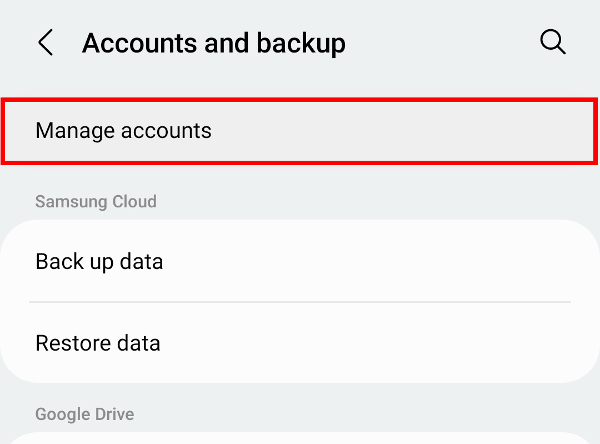
Tap on “Manage accounts.”
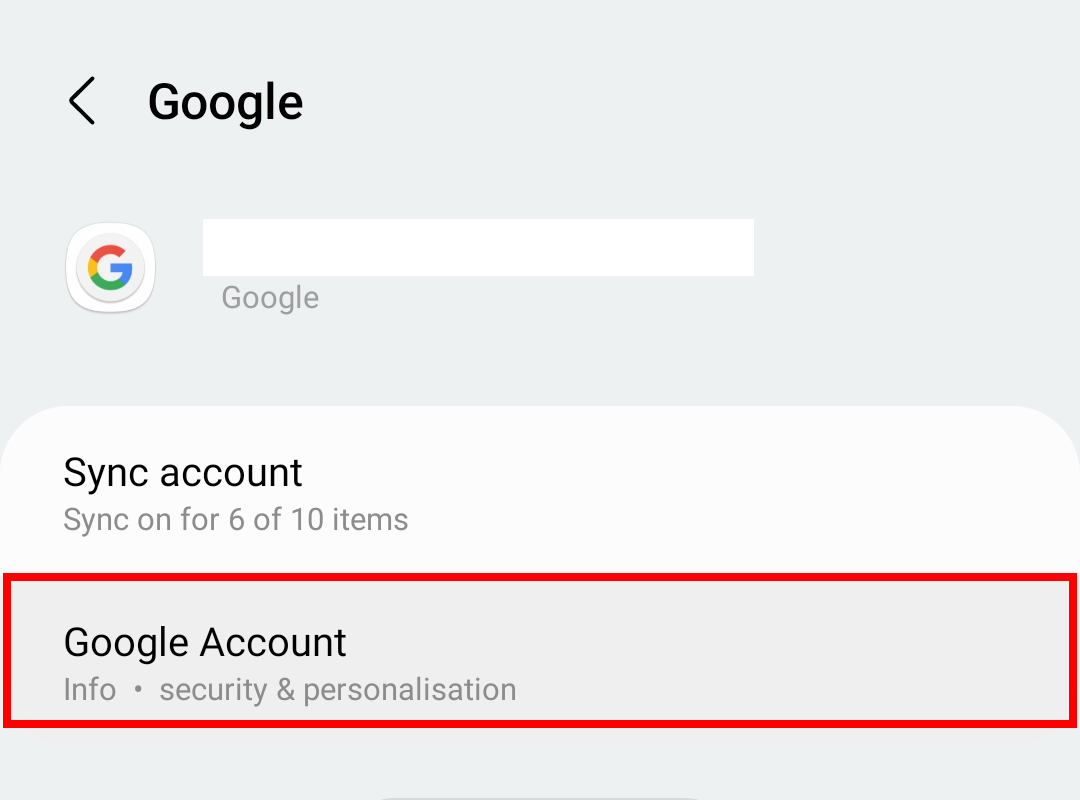
Choose your Google account and tap “Google Account.”
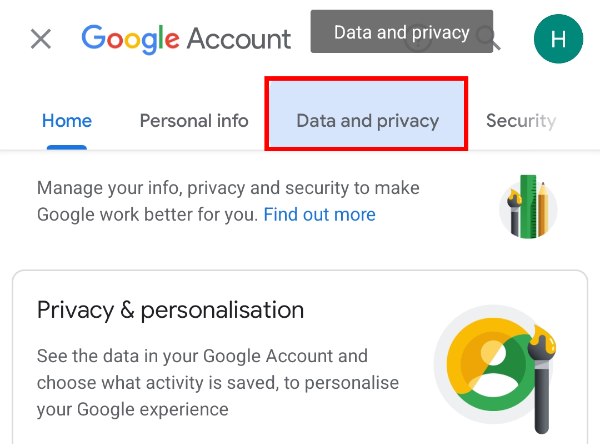
Navigate to the “Data and Privacy” tab.
Scroll down to “History settings,” and you’ll find three key options. “Web & App Activity” details all the data Google collects on how you use its apps and websites, “Location History” tracks your movements, and “YouTube History” logs every video you watch on the platform for recommendations.
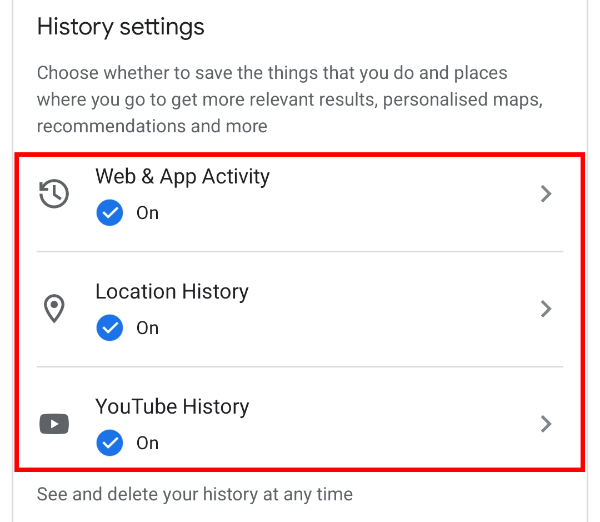
Tap on any of them and toggle them off or refine how they use your data. Alternatively, you can use “Auto-Delete” to limit how long Google can keep your data (from three to 36 months). You can also use the “Manage activity” option to delete individual logs.
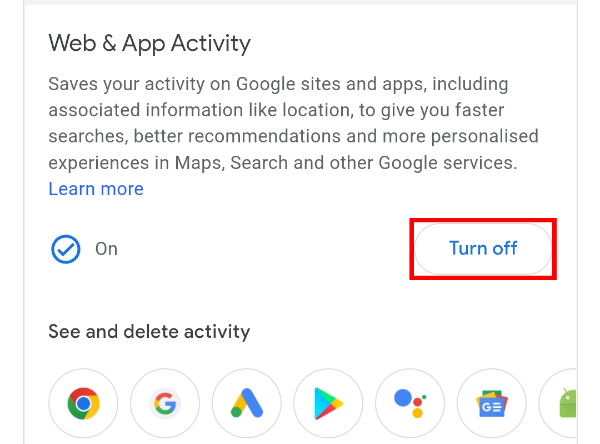
Once you’re done with those options, head back to the “Data and privacy” tab and scroll lower to “Ad Settings.”
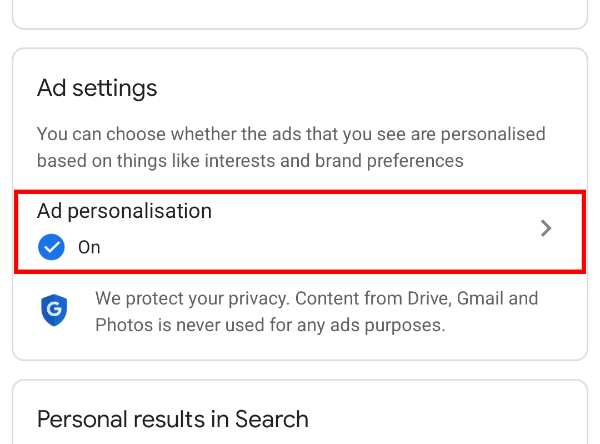
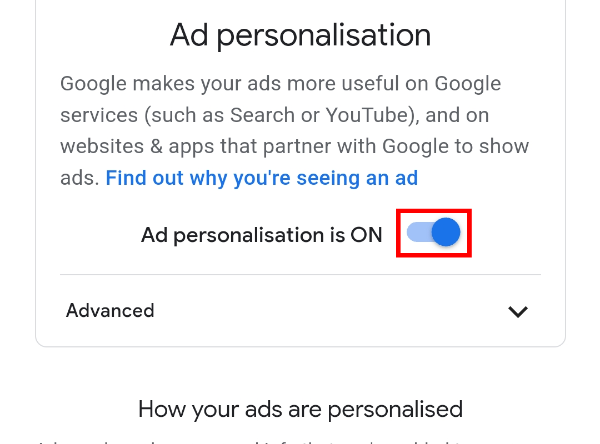
With a single toggle, you can prevent Google from using your personal information to personalize the ads it serves you. Alternatively, you can leave it on and instead control the data points Google uses to tailor ads. These include information collected from your profile and online activity, such as age, gender, language, etc.
It’s challenging to shut off tracking altogether, but you can limit it greatly by implementing the above steps. But if you’re really paranoid (and technically savvy), you may want to consider flashing a custom ROM like GrapheneOS or getting a Linux-based phone such as the Purism Librem 5 or the Pine64 PinePhone Pro .
Related: What Is GrapheneOS, and How Does It Make Android More Private?
Also read:
- [New] 2024 Approved Aspect Ratio Preferences on Facebook Vids
- [Updated] Downloading Vimeo Media Direct Conversion to MP3 Format
- [Updated] Exploring LG's Ultra HD Tech 27UD68 Monitor Deep Dive
- [Updated] Rapid Renders of PowerPoint Plays for 2024
- 4 Ways to Transfer Music from Tecno Phantom V Fold to iPhone | Dr.fone
- Complete Guide: Updating Your MP280 Printer's Driver for Windows 11, 8 & 7
- Effortless Setup for Your Linksys AE1200 Router - Instant Access to the Newest Drivers
- HP Color LaserJet Pro M477 Driver Software – Quick Download Guide for Easy Setup and Use
- In 2024, A New Chapter for Recording Tech? Dive Into the 2023 Apeaksoft Update
- In 2024, Top 11 Techniques for Spectacular Color Enhancement
- Overcome CSR8510 A10 Graphics Card Drivers Challenges in Windows: Step-by-Step Fixes
- The Ultimate Explainer: Leveraging Facebook’s Transparency Toolkit
- Title: Step-by-Step Strategies for Securing Your Android Smartphone
- Author: Joseph
- Created at : 2024-10-23 02:19:33
- Updated at : 2024-10-25 07:04:37
- Link: https://hardware-help.techidaily.com/step-by-step-strategies-for-securing-your-android-smartphone/
- License: This work is licensed under CC BY-NC-SA 4.0.